The first cover of the year is done and dusted and even approved... funny that.
It features original art from PhilCold at Dreamstime.
And words by me.
As you can see from the cover steps below, it was a simple cover to create, and the art work is what makes it.
Step 1: Update the short story template to the desired title and sub-title:
Step 2: Choose your art, resize, and position it so that you achieve the best effect for your cover. (Note: not all of Phil's original art can be seen here; you'll have to go to Dreamstime to check it out.)
Most of you know me as the C.M. Simpson that writes - well, some of you know me as the C.M. Simpson that writes - and some of you have never heard of me at all.For those of you who don't care about my writing, but do like seeing what I'm doing with pictures, this blog will feature photographs of birds, insects, arachnids, flowers, as well as locations I find myself visiting and book covers I design. Oh, and there will be art - of a kind.
Showing posts with label science fiction. Show all posts
Tuesday, 1 January 2019
Latest Cover Design - Miguel Unmade
Labels:
book cover,
cover art,
cover design,
Dreamstime,
PhilCold,
science fiction
Location:
Canberra ACT 2601, Australia
Monday, 26 March 2018
Latest Cover Design—Mack ‘n’ Me: Blaedergil’s Host
Following up from February, I’ve created the second cover in
the Mack
‘n’ Me ‘n’ Odyssey series. The second novel, Mack ‘n’ Me: Blaedergil’s Host
takes place a little ways down the track and has a bit of political intrigue,
but essentially continues the story of Cutter and Mack as they work out their
working relationship.
The first step was the usual use of a template designed for
the series.
The second step was a lot easier because of my previous
forays onto Dreamstime. I chose a planetary background by Forplayday that had a myriad of
stars, because it seemed reminiscent of the word ‘host’ in the novel’s title.
It needed to be resized, and then the layer had to be shifted so that it lay
under the words for the title and byline.
After that, I used the second in a series of characterimages by Yekophotostudio that I’d found on Dreamstime. I tried out how it
looked both under the planet layer, and above it, and decided to over lay it.
After that, I isolated the guy and girl elements from the original background,
and positioned them at the base of the cover in the foreground.
That was the easy part.
The next step was to get them to blend together to form a
more cohesive image. At this point, I decided the flesh tones and natural
colouring weren’t quite what I was looking for, although they looked okay. All manipulation was done in GIMP.
The first thing I did was darken the character image to -29,
using the ‘Color Saturation’ tool under the Colors drop-down menu. I then
decreased the Hue Saturation to -49 in the ‘Hue Saturation’ tool under the
‘Colors’ drop-down menu, and then highlighted the planetary layer, and
then I played with the ‘Brightness-Contrast’ tool (also found under the
‘Colors’ drop-down tab, and adjusted the entire image, bringing the brightness
up to +2, and increasing the contrast to +58.
I still wasn’t happy with the effect, so I used the ‘Color
Balance’ tool to adjust the background, increasing the hue saturation by +38,
reducing the lightness by -33 and increasing the saturation by +15. After that,
I decided I wanted more yellow in the background, so I used the ‘Color Balance’
tool to reduce the yellow-blue balance by -49.
After that, I wasn’t sure if I was happy with the
background, or not, so I returned to the step I’d saved as Dev10—and this
taught me the important of saving the image at each step, because it’s much
easier to go back to a saved step and rework it, than to try to undo everything
to get the image looking like it did, at that step. It’s
also useful to put the abbreviated changes into the saved .jpg file title, so
you remember what you did, when you go back to it.
After returning to Dev10, I
used the Color Balance tool to increase the yellow-blue balance by +60, and
then reduced the cyan-red to -18, and finally tweaked the yellow-blue colour
balance line another -49 on the planetary layer. The last step was to use the
Brightness-Contrast tool to reduce the brightness by -49, so that the words
became more visible.
This was the image, I finally decided on.
Of course, I then discovered I’d missed something while
isolating the character image. The errored image is on the left, the corrected
image on the right. I count it as a lesson in vigilance.
Labels:
#bookcover,
#coverdesign,
#gimp,
Blaedergil's Host,
C.M. Simpson,
creating covers,
Gimp,
Mack 'n Me,
science fiction
Location:
Canberra ACT 2601, Australia
Sunday, 25 March 2018
Latest Cover Design: Mack ‘n’ Me: Origins
Looking back, I can see that February was a month for
designing science fiction covers… and that this is a trend that is likely to
continue, given that there is also a series of science fiction novels coming.
Here is the cover process for the novel. Knowing it was
going to be a series, I knew it would be ideal if I could find several photos
with the same models dressed the way I needed them. That part was essential.
This was trickier than it sounds because I wanted a female with a gun. I know
I’ve mentioned this before, but it still hasn’t changed. Male photographers…
and even some female ones, don’t seem to understand that women who can use a
weapon should be dressed – and posed! – like they mean serious business… not
like some sex kitten for whom a gun is a novelty toy, and the battlefield a far
off idea, and certainly not like a victim waiting to happen.
First up, I chose a different font to the one used for the
title of C.M.’s short stories. I wanted something a little bit more ‘science
fiction’. For this, I used GIMP’s Verdana font—and I used GIMP’s Sylfaen for
the byline. The background layer, I kept black.
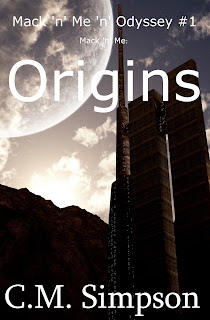
The second step was to use the ‘Open as Layers’ option under
the ‘File’ tab to import Keremgor’s ‘science fiction buildings’ image (also from Dreamstime) into the
cover. It was a little small, so I had to use the ‘Scale tool’ in the Toolbox
to increase the size.

(TIP: When using this tool, make sure the chain link
beside the height and width boxes is UN-broken, or the image will not size
proportionately.)
I also had to move the picture layer down in the 'Layers' box so that it sat behind the words' layers.
The second thing I did was use the ‘Flip tool’ in the tool
box to reverse the image so the buildings and moon were on opposite sides to
the original. The final step in this phase was to drag the image around using
the ‘Move tool’ in the Toolbox, until I had it positioned where I wanted,
before I used the ‘Autocrop Image’ option in the ‘Image’ tab drop-down to trim
the layer to the cover size and excise any unneeded portions of Keremgor’s
image.
After that I went through the process for isolating
Yekophotostudio’s characters from their original background, and using the
‘Open as Layers’ option in the ‘File’ menu to import them into the cover image
document. After that, I resized them, and then increased the contrast of that
layer using the ‘Brightness-Contrast’ option in the ‘Colors’ tab drop-down.
I didn’t like the hard edges to the flames, so I used the
‘Erase tool’ in the Toolbox, choosing a circle with blurred edges, and
adjusting its width and opacity before using it to fade the fire and blur and
blend the edges into the background image. Once that was done, I blurred the
hairline, the gap between the characters and other edges that bothered me.
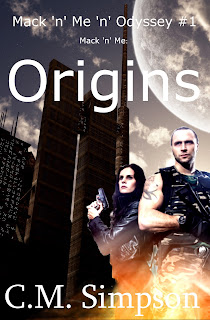
When I was happy with the way the character image blended
with the background image, I played with GIMP's ‘Brightness-Contrast’,
‘Color-Balance’ (blue), and ‘Hue-Saturation’ (blue) options to be found under
the ‘Colors’ tab on the top menu—and then I blurred the hairline some more,
because it had started to bother me, again.
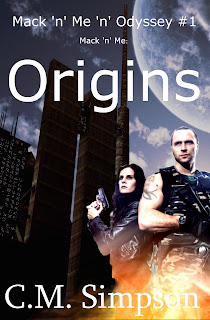
This is the final cover:
Labels:
#bookcover,
#coverdesign,
#newcover,
C.M. Simpson,
cover design,
Mack 'n Me,
Mack 'n' Me 'n' Odyssey,
novel,
Origins,
science fiction
Location:
Canberra ACT 2601, Australia
Subscribe to:
Posts (Atom)


