© Photographer: Astrobobo | Agency: Dreamstime.com

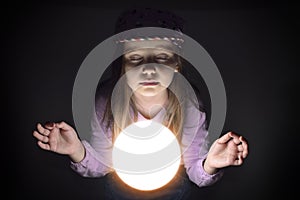
I didn't really want a gypsy-style cover; My ideal would have been a girl holding the orb in front of her, but I couldn't find anything even close to this. I also wanted a slightly older Liralee, so the first step had to be to snip away the gypsy elements. This also helped make the age more indeterminate.
I used GIMP to change the picture dimensions to 1875x3110, even though that was a little taller than the end goal of 1875x2850. It left room to manipulate the picture.
The second step was to try to get some of the colours described to the orb in the picture... or to remove the colour entirely from the picture. So, I saved the snip and resize and tried a number of tweaks using GIMP's excellent Colour Tools.

Tweak 1:
Click Colors
Click Hue Saturation.
Reduce the saturation levels only

Tweak 2:
Click Colors
Click Colorise
Adjust Hue to 174
Adjust Saturation to 26
Adjust Lightness to -23

Tweak 3:
Click Colors
Click Adjust brightness and contrast
Adjust Brightness to -50
Adjust Contrast to 18

Tweak 4:
Click Filters
Click Artistic
Click Clothify

Tweak 5:
Click Colors
Click Color Balance
Adjust the Cyan-Red slide to 56
Adjust the Magenta-Green slide to 55
Adjust the Yellow-Blue slide to 15
Once I was kinda happy with the image, I went into GIMP and chose File>New to start my new image. I selected a width of 1875 and a height of 2850, and then clicked on Advanced Options. In Advanced Options, I adjusted both the X and Y resolutions to 300 and then clicked OK.
At first, I thought I was finished, so I added in the title, using Segoe Print Bold at 290, and the byline, using Bell MT Bold at 260. The result wasn't bad...

You see, the orb is supposed to be this magical glowing ball of multi-coloured light - which the orb on this cover clearly is not. So I added colour to the orb as follows:

Adding Colour to the Orb:
Go to Toolbox
Click on Free Select Tool
Outline the orb
Go to Filters
Click on Render
Click on Clouds
Click on Plasma
This was nice, but I thought I'd see what it would look like if I tried out a few other options.

The No-Colour Option
Select the entire cover
Go to Tools
Click on Color Tools
Click on Desaturate
I wasn't too keen on the no-colour option; it undid all that experimenting I'd tried before adding in the title and byline. I tried again.

The Multiple-Orb Option
Go to Filters
Click on Map
Click on Make Seamless


The Greyed-Out Cover Option
Go to Filters
Click on Distorts
Click on Emboss
The Swirling Orb Option
Go to Filters
Click on Map
Click on Illusion
While I was doing all this, one thing kept bothering me, and that was that the edge of the orb looked rough and obviously cut out. As I was getting ready to resign myself to it, I realised that the Toolbox had an Ellipse Select Tool, which would create lovely round shapes with smooth edges. Well, duh. I reworked the orb's edges using the tool and voila, a nice round orb.
This is the cover I went with in the end.

And the story? Well, Carlie tells me it's not the newest idea under the sun, but she enjoyed writing it, and she hopes the younger audience will enjoy reading it.
When
Liralee buys an orb from the Shawl Lady’s stall, she opens a path to another
world, for the orb is not just a pretty glass ball that impresses her friends;
it’s a symbol of power that produces magic for enchantments. And it’s wanted by
two warring kingdoms and a sorcerer with plans of conquest. When strangers try
to take the orb, and her friends gather to aid her, Liralee begins an adventure
that could end in disaster or victory. The choice is hers.
No comments:
Post a Comment